
この記事ではSWELLで
ショートコードを使用して「関連記事」を任意の場所に表示する方法
をご紹介します。
SWELLの「関連記事」はデフォルトだと決められた場所に表示されますが、
今回ご紹介する方法を使用することで自分の好きな場所に「関連記事」を表示できるため、上手く活用することで回遊率を高めることが可能です。
 ケケンタ
ケケンタ本記事の内容がお役に立てば何よりです!

Webアニメーションの引き出しを増やしたい人におすすめの書籍


もしプログラミング学習やお仕事で運動不足が気になっているなら
連続屈伸運動がおすすめです!
ボタンにカーソルを合わせるだけで
カウントダウンが始まるタイマーをご用意してみました!
ケケンタ無理のない範囲で、ぜひ隙間時間に屈伸運動を取り入れてみて下さい!
タイマースタート
3:00

【全体の流れ】ショートコードで「関連記事」を任意の場所に表示する
ケケンタこの記事でご紹介する内容の流れをザックリまとめると以下のようになります。
- SWELLのデフォルト機能で出力されている「関連記事」のHTML構造に基づき、記事ごとの出力用HTMLを用意する
- 表示中の投稿の「関連記事」をWP_Queryで取得する
- ①で書いた処理と②で取得したデータをループで回して「関連記事」を出力する
- ここまでの処理①~③をショートコードに登録して任意の場所で表示できるようにする
ソースコード
ソースコード全体は以下の通りです。
以下2つのソースコードをfunctions.phpに追記し、ショートコード「my_short_create_related_post_list」を任意の場所に記述するだけで「関連記事」を出力できます。
※子テーマのfunctoins.phpにソースコードを追加する手順はこちら(この記事内の別項目に移動します)
記事ごとの出力用HTML
function create_related_post() {
  // サムネイル(サムネイルの有無によって表示する画像をサムネイル or NO IMAGE画像を設定)
  $thumb_url = has_post_thumbnail()
                  ? get_the_post_thumbnail_url(get_the_ID(), 'medium')
                  : 'https://サイトドメイン(例:kekenta-it-blog.com)/wp-content/themes/swell/assets/img/no_img.png';
                     // ↑このURL=NO IMAGE画像は任意のものでOK
  $permalink = get_the_permalink();   // 記事リンク
  $title     = get_the_title();       // タイトル
  $date      = get_the_date('Y-m-d'); // 公開日

  // 関連記事のHTML
  $html  = <<<CURRENT_POST
    <li class="p-postList__item">
      <a href="{$permalink}" class="p-postList__link">
        <div class="p-postList__thumb c-postThumb">
          <figure class="c-postThumb__figure">
            <img width="300" height="169" src="{$thumb_url}" alt="{$title}" class="c-postThumb__img u-obf-cover">
          </figure>
        </div>
        <div class="p-postList__body">
          <div class="p-postList__title">{$title}</div>
          <div class="p-postList__meta">
            <div class="p-postList__times c-postTimes u-thin">
              <time class="c-postTimes__posted icon-posted" datetime="{$date}" aria-label="公開日">{$date}</time>
            </div>
          </div>
        </div>
        </a>
    </li>
    CURRENT_POST;

  return $html;
}
「WP_Queryで取得した関連記事をループで取得する処理」をショートコードに登録
function create_related_post_list() {
  $html  = '<section class="l-articleBottom__section -related">';
  $html .= '<h2 class="l-articleBottom__title c-secTitle">関連記事</h2>';
  $html .= '<ul class="p-postList p-relatedPosts -type-card">';

  // 関連記事の呼び出し
  $args = array(
    'post_type'       => 'post',                      // 「投稿」の記事を取得
    'category_name'   => get_the_category()[0]->slug, // 表示中の記事のカテゴリーを指定
    "post__not_in"    => [get_the_ID()],              // 表示中の記事は「関連記事」に含めない
    'posts_per_page'  => 8,                           // 8件の記事を取得する(※調整可能)
  );
  $the_query = new WP_Query( $args );

  if ( $the_query->have_posts() ) :
    while ( $the_query->have_posts() ) : $the_query->the_post();

      // 関連記事をひとつずつ取得
      $html .= create_related_post();

    endwhile;
  endif;
  wp_reset_postdata();

  $html .= '</ul></section>';

  echo $html;
}
add_shortcode('my_short_create_related_post_list', 'create_related_post_list');ご興味のある方に向けて、以下より簡単に解説をしていきます。
解説
① 記事ごとの出力用HTML
今回、「関連記事」のHTML構造をあえてSWELLで使用されているものと同じものにしています。
理由
- 構造をまったく同じにすればSWELLでデフォルトで使用している「関連記事」と同じ見た目になる
- SWELLで設定した内容が今回作成する「関連記事」の見た目にも反映されるようになる
デフォルトの「関連記事」の構造を引用して組み立てたのが以下のソースコードです。
デフォルトの「関連記事」の構造を引用して組み立てたソースコード
function create_related_post() {
  // サムネイル(サムネイルの有無によって表示する画像をサムネイル or NO IMAGE画像を設定)
  $thumb_url = has_post_thumbnail()
                  ? get_the_post_thumbnail_url(get_the_ID(), 'medium')
                  : 'https://サイトドメイン(例:kekenta-it-blog.com)/wp-content/themes/swell/assets/img/no_img.png';
                     // ↑このURL=NO IMAGE画像は任意のものでOK
  $permalink = get_the_permalink();   // 記事リンク
  $title     = get_the_title();       // タイトル
  $date      = get_the_date('Y-m-d'); // 公開日

  // 関連記事のHTML
  $html  = <<<CURRENT_POST
    <li class="p-postList__item">
      <a href="{$permalink}" class="p-postList__link">
        <div class="p-postList__thumb c-postThumb">
          <figure class="c-postThumb__figure">
            <img width="300" height="169" src="{$thumb_url}" alt="{$title}" class="c-postThumb__img u-obf-cover">
          </figure>
        </div>
        <div class="p-postList__body">
          <div class="p-postList__title">{$title}</div>
          <div class="p-postList__meta">
            <div class="p-postList__times c-postTimes u-thin">
              <time class="c-postTimes__posted icon-posted" datetime="{$date}" aria-label="公開日">{$date}</time>
            </div>
          </div>
        </div>
        </a>
    </li>
    CURRENT_POST;

  return $html;
}3~9行目では記事ひとつひとつのアイキャッチ画像や個別ページへのリンク、タイトル、日付を取得しています。
ちなみに以下の部分で設定しているURLは「アイキャッチ画像が未設定だった場合に出力される画像のURL」です。
アイキャッチ画像が未設定だった場合に出力される画像のURL
$thumb_url = has_post_thumbnail()
                  ? get_the_post_thumbnail_url(get_the_ID(), 'medium')
                  : 'https://サイトドメイン(例:kekenta-it-blog.com)/wp-content/themes/swell/assets/img/no_img.png';
// ↑このURL=NO IMAGE画像は任意のものでOKそして以下の部分に各情報を当て込み、このあと改めてご紹介するループ処理で記事ひとつひとつが正しく出力されるように構造を整えています。
HTML内に取得済みの各情報を当て込んでいる
// 関連記事のHTML
$html  = <<<CURRENT_POST
  <li class="p-postList__item">
    <a href="{$permalink}" class="p-postList__link">
      <div class="p-postList__thumb c-postThumb">
        <figure class="c-postThumb__figure">
          <img width="300" height="169" src="{$thumb_url}" alt="{$title}" class="c-postThumb__img u-obf-cover">
        </figure>
      </div>
      <div class="p-postList__body">
        <div class="p-postList__title">{$title}</div>
        <div class="p-postList__meta">
          <div class="p-postList__times c-postTimes u-thin">
            <time class="c-postTimes__posted icon-posted" datetime="{$date}" aria-label="公開日">{$date}</time>
          </div>
        </div>
      </div>
      </a>
  </li>
  CURRENT_POST;
②「WP_Queryで取得した関連記事をループで取得する処理」をショートコードに登録
2つ目にご紹介したソースコードでは
- まずWP_Queryで現在表示中の投稿の「関連記事」(ここでは同じカテゴリーを8記事)を取得し
- それを「①記事ごとの出力用HTML」でご紹介した処理を用いてループで出力しています
function create_related_post_list() {
  $html  = '<section class="l-articleBottom__section -related">';
  $html .= '<h2 class="l-articleBottom__title c-secTitle">関連記事</h2>';
  $html .= '<ul class="p-postList p-relatedPosts -type-card">';

  // 関連記事の呼び出し
  $args = array(
    'post_type'       => 'post',                      // 「投稿」の記事を取得
    'category_name'   => get_the_category()[0]->slug, // 表示中の記事のカテゴリーを指定
    "post__not_in"    => [get_the_ID()],              // 表示中の記事は「関連記事」に含めない
    'posts_per_page'  => 8,                           // 8件の記事を取得する(※調整可能)
  );
  $the_query = new WP_Query( $args );

  // ここからループを回している
  if ( $the_query->have_posts() ) :
    while ( $the_query->have_posts() ) : $the_query->the_post();

      // 関連記事をひとつずつ取得
      $html .= create_related_post();

    endwhile;
  endif;
  wp_reset_postdata();
  // ループ処理ここまで

  $html .= '</ul></section>';

  echo $html;
}
add_shortcode('my_short_create_related_post_list', 'create_related_post_list');
ここで登場しているHTML構造もSWELLのデフォルトの「関連記事」を引用したものとなっています。
ケケンタ最終行のadd_shortcodeで上記の処理をショートコード名「my_short_create_related_post_list」として登録をしています。
以上で任意の場所に「関連記事」を出力するショートコードの用意ができました。
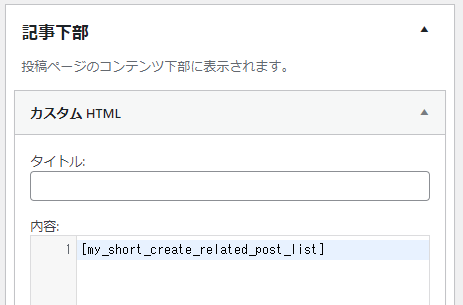
あとはこれを好きな場所(例えばウィジェットの「記事下部」)に貼り付ければ、「関連記事」が出力されます。
使用例
SWELLの子テーマのfunctions.phpにソースコードを追加する方法
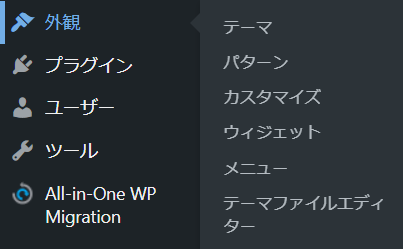
まずは管理画面の「外観」→「テーマファイルエディタ」をクリックします。
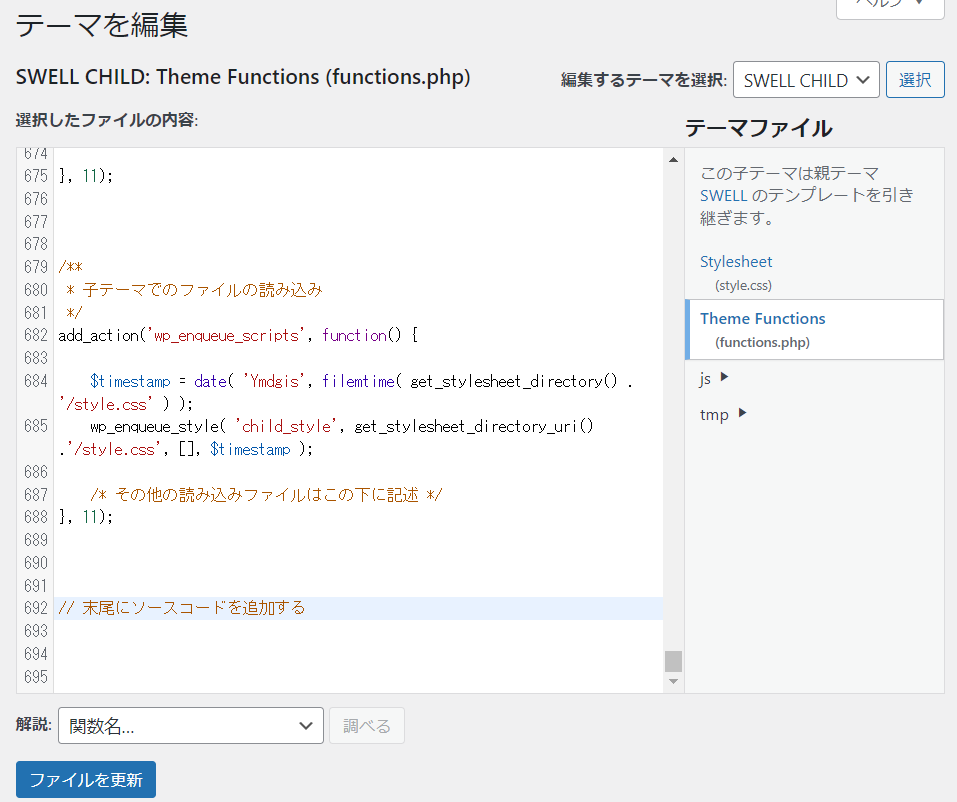
すると以下のような画面が表示されるので、右側にある「Theme Functions(functions.php)」をクリックします。

続いて、エディタの末尾にソースコードを追加します。
 ケケンタ
ケケンタソースコードを追加したら、最後に画面左下の「ファイルを更新」をクリックして完了です。
まとめ
ケケンタ以上がSWELLで「関連記事」を任意の場所に出力する方法でした!
SWELLのデフォルト機能では関連記事は元々決められた場所にしか出力することができません。
しかし、今回ご紹介した方法を使用すれば自分が好きな場所にショートコードを設置=「関連記事」を出力することが可能です。
オリジナリティを出したり回遊率を高めるために上手く活用していただければ何よりです!
このブログでは、他にもWordPressやWeb制作、PHPについて様々な情報を発信していますので、色々見ていただけると嬉しいです。
それでは最後までご覧いただきありがとうございました!

コメント